Recently, one of our graduate level classes had a project where we were tasked with coming up with a Return Oriented Programming(ROP) attack for CPU architectures popular in embedded devices. Given the hardware I had on hand, I chose to attack the Raspberry Pi2 which uses the 32-bit ARMv7 architecture. It was an interesting experiment which highlights the importance of scrubbing inputs and performing bounds checks in our programs – especially in-house applications tailor made to perform very specific tasks.
There are already a multitude of defenses against ROP attacks on many modern systems. For instance, the linux kernel has long since provided Address Space Layout Randomization (ASLR) and GCC usually has its stack protector flag on by default.
While these security measures do make it more difficult to perform such attacks the use of such mechanisms often incurs an operational overhead cost which many embedded systems operating on tight performance, price, and power margins are unable to afford, and thus do not enable.
Background on Buffer Overflows
In the realm of security very often small vulnerabilities provide footholds for larger, more dangerous bugs and exploits. One such exploit is more common than you would think – it’s called a buffer overflow vulnerability. Return-oriented programming attacks occur when there is some way to gain access to the Program Counter and control the execution flow of the program, and buffer overflows provide exactly that.
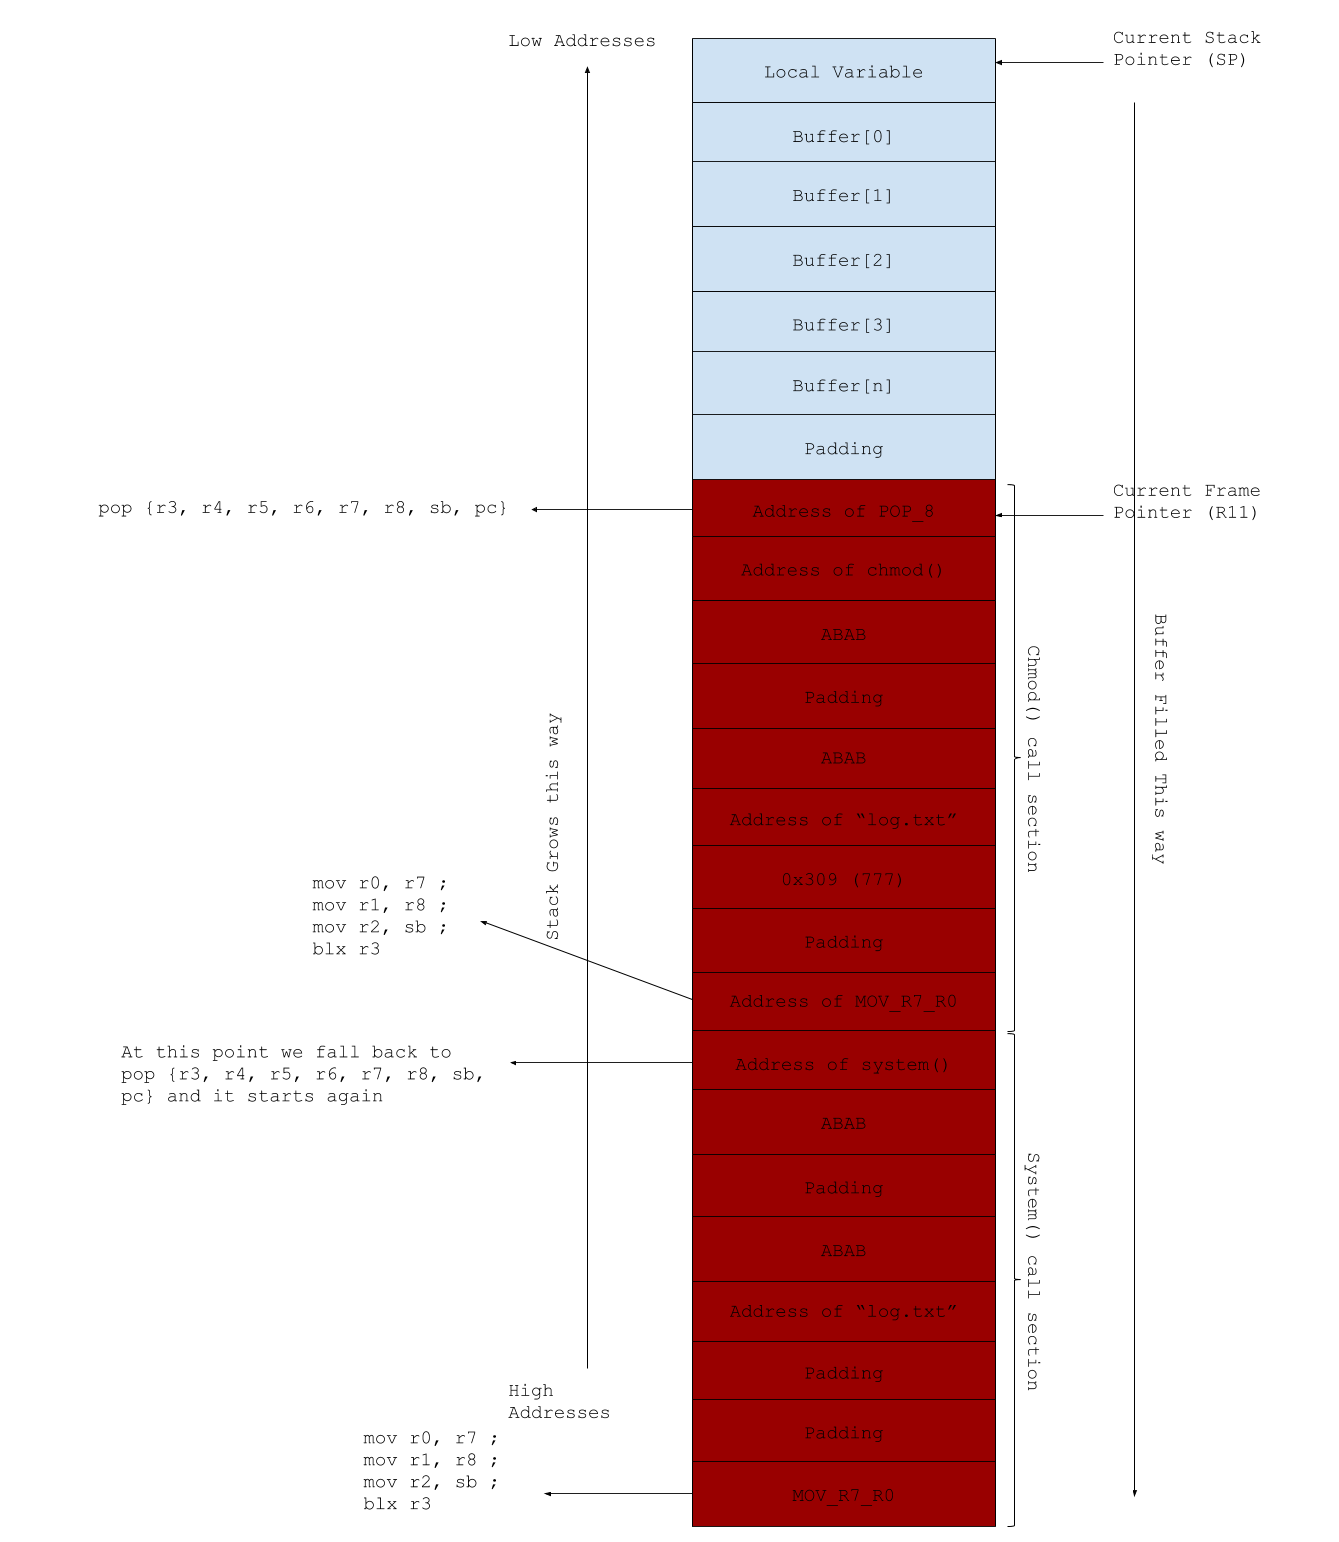
In a typical C program running on 32-bit ARM, when a function calls another function, its old link register and frame pointer of the previous stack frame are saved onto the stack before making way for the automatic variables in the new frame. An example of a stack frame is shown below:

A buffer overflow happens when the Old Link Register address, highlighted in Red is overwritten. Upon returning from this function, the old link register will be popped from the stack and swapped into the Program Counter (PC) and the computer will continue executing the instructions at that address. The key here is to overwrite that stack slot with an address of our choosing, redirecting the control flow of the program. The most common way this is done is when there is an array declared as a local variable in the function. If bounds are not properly checked, certain functions such as strcpy, read, and recv can write more bytes than was allocated on the stack, causing an overflow, allowing the attacker to write to the Old Link Register address.
ROP Background
Before we go to our exploit, we’ll just touch a bit on the general idea of ROP. Once we have control over the program counter through the buffer overflow, what do we do? Before Data Execution Prevention, what would often happen is hackers would inject shellcode (essentially machine code instructions) into the stack via the same overflow we just exploited and have the PC jump back to the stack with the help of a NOP slide. This is no longer possible due to a simple mechanism known as Data Execution Prevention(DEP). I didn’t add this into the list of ignored security features because DEP has a fairly light overhead. In essence, the stack Virtual Memory Area (VMA, we discussed this in the previous blog post) is marked as readable, writable, but not executable.
If you’re on a Linux system you can see it for yourself. Just print your VMA mapping of the current process by doing sudo cat /proc/self/maps and look at the VMA marked as [stack]. You will see its access flags should be set to rw-p. A funny thing to note is Raspbian has its DEP disabled by default for some reason…but we’re not going to take the easy way out and send a shell script as that would be trivial compared to ROP, and where would the fun be in that!?
7ffd8760f000-7ffd87630000 rw-p 00000000 00:00 0 [stack]To get around DEP, we will jump to snippets of machine instructions in existing .txt sections in the application itself and libraries that have been loaded in. We call these gadgets. The key here is we are not strictly bound by program execution flow. We can jump for gadget to gadget to perform a myriad of instructions.
Target System
Alright! Enough background, let’s get to the fun stuff – the target system and the attacker!
Our setup for the victim is shown below. We assume the system is a temperature sensor connected to a RaspberryPi 2. The computer in the middle is our intruder which will send the overloaded payload. The RPI2 acts as a connection to a server and may perform data analysis on the data before sending updates to the server. Every hour, the temperature sensor module sends data over the UART bus to the RPI2 in the form of a data log. The RPI2 will then save the data into a temporary log file until the communication is complete before swapping the temporary file with the log file.

The pseudocode of the application on the Raspberry Pi2 might look like the following:
for (;;){
    if (log.txt doesn't exist)
         Create log.txt and block at read
         When data arrives, get header
         Read N bytes into buffer using header's information
         Close(log.txt)

   else if(log.txt exists)
         Create temp.txt and block at read
         When data arrives, get header
         Read N bytes into buffer using header's information
         Replace log.txt with temp.txt
}
The header is shown here:

This is a reasonable setup to emulate embedded systems which might be out in the field. In my years working as an embedded software engineer I have seen similar application level communication protocols to send other types of data. Not necessarily over UART, but the implications are the same – we can control the number of bytes being read in as the payload if we have a malicious header and if bounds checking is not enforced.
The Attack
The attacker will run a C Program that sends the log file payload over to the victim RPI2. In order to find the amount of padding we require to overflow and reach the old Link Register’s location, we first send an experimental payload of varying characters and run GDB on the RPI2.
We note how far we are at this point from where R11 is pointed to (Refer back to the stack diagram) and add or decrease padding until we reach the stack slot right before the target slot. There is a more scientific method of performing this task – using a pattern generator provided by the metasploit framework and finding the offset into the unique pattern but it was not necessary since we had access to the RPI2 and could view the state of the stack at the time of the overflow. I find the best way to test this quickly is by using python to create the payload file:

Now that we have the padding required to overflow to the old Link Register’s slot, we need to search for a list of gadgets to add to our ROP payload. There are many ways to find gadgets – by using radare2, objdump, or by using ROPgadget. We used ROPgadget to dump out a list of gadgets from the program binary. Here’s some of them:

Notice that all gadgets end with an instruction that changes the execution flow, be it a blx to r3, a bx to r3, or a pop pc. This allows us to chain multiple gadgets together to perform all sorts of operations. ROP itself is turing complete – we can make loops, conditionals and jumps using it. However, we do not need many gadgets to perform dangerous operations.
In our case, we simply want to do the following in order:
- Send a seemingly benign log file over to the Raspberry Pi2 with no overflows. This will actually contain a bash script to echo “Here be dragons”. (This can be modified to contain other more malicious commands as we’ll see later). Recall that on completion of logfile transfer it will be saved as “log.txt”.
- Send a malicious header+payload to overflow device while it’s writing to “temp.txt”.
- Malicious payload will call chmod(“log.txt”, 777), followed by system(“log.txt”) to execute the shell script.
On an instruction level, however, we will need to follow the ARM function calling convention in order to set the arguments for these functions. We need these in order to perform the calls:
- Address of chmod function loaded in libc.
- Address of system function loaded in libc.
- Address of “log.txt” string. This will be in the .rodata section.
- Gadget or list of gadgets to load or pop data from our stack payload to r0 and r1, the first two arguments of a function call.
chmod, the “log.txt” string and system can easily be found with the use of gdb. Remember to break in main AFTER libc has been loaded to memory:

We now have requirements 1, 2, and 3. To fulfill 4, we look into the list of gadgets we found earlier and find gadgets which can help us. We will use these gadgets found in libc:

- Number 1 will pop 8 values from the stack into these registers in order.
- Number 2 will move r7 into r0, r8 into r1, r9 into r2.
- Number 3 will branch to the address in r3.
With these, we are capable of performing as many 3-argument libc calls as we want as long as we have remaining overflowed stack.
Let’s walk through it:
- The first gadget we jump to is at tag (1). This gadget will pop 8 values from the stack. Thus, we will load our stack with the following:
- Address of our first libc call, in this case,chmod.
- Some value, doesn’t matter what it is. We used 0x42414241 (ABAB).
- Padding, don’t care.
- Some value, doesn’t matter what it is as long as it’s the same as (b). We used 0x42414241 (ABAB).
- Address of “log.txt” string. For us, that string was “/home/pi/pirop/log.txt”.f) 0x309. This is equivalent to 777 in decimal, this will be the second argument.
- Padding, don’t care.
- Address of gadget at (2), mov r0, r72.
- After the gadget at (1) has executed, it will jump to the gadget at (2) because the address of the gadget at (2)was popped to the PC. It will execute until it reaches the instruction at (3) which will then branch, link, and exchange to the address contained in r3 – our chmod call.
- Upon returning, the PC will execute the cmp r4, r6 instruction. Since they were made to be equal, it continues past the bne instruction and we are once again back to the gadget at (1). We then loop this sequence once more for the system() libc call. For the remainder of the discussion, we will give these gadgets names. The gadget at tag (1) will be called POP_8 because it pops 8 values from the stack and the gadget at tag (2) will be called MOV_R7_R0 after the first instruction in the sequence.
With this in mind, this is how our overflowed stack will look like:
Putting it all together
We complete our ROP payload python file following the stack layout detailed earlier:

Start up the program on the Pi, send the shell script with a good header from the computer, then send the exploit payload, and watch as the magic happens:

As seen in the screenshot above, log.txt is now readable, writable, and executable. It contained the script to echo “Here be dragons!”. This, of course, is benign, but dangerous shell script payloads include:
mosquitto_pub -h iot.eclipse.org -t home/garage_door -m "OPEN" Or a payload to add the public key of a server and the attacker and have the Pi reverse ssh to that server, providing the attacker will remote password-less ssh capability to the system.
I hope you found this an interesting read. Moral of the story – do bounds checking!

Ah the good old buffer overflow I see
LikeLike